Friday 27 May 2011

A cake to remember

This week I was unbelievably chuffed when a friend from work asked me to make 21 cupcakes for her daughter's 18th party. I was more than happy to oblige, but the pressure was on because I knew they had to be perfect!

She absolutely loved my orange cakes with the roses, so i went for 10 of these, and 11 lemon cakes.

I made these cakes in some pretty purple cases I bought from one of my fave baking supplies shops, Almond Art, made by Foilcraft...let me tell you, I could not recommend them less. They were truly shocking from the moment I took them out of the packaging. Now I don't want this blog post to turn into a moan, but I need somewhere to vent my anger! My orange cupcakes came out beautifully and, as last time I made them, rose to perfection.

Sadly, my cakes were spoilt by these awful cases. The purple colour rubbed off on my hands when I picked them up, the purple bled through to the inside of the case and purple came off into my muffin tray, permanently staining it. I was devastated. But my hands were tied, and I had no other cases at 10pm the night before the cakes were due, and I had to stick with them (I get up for work at 7.30am so I had no choice!). I unwrapped a few cakes, and the purple hadn't rubbed off onto the cakes (thankfully). All I could do was apologise profusely to my friend for the awful, awful cases and hope it didn't put her off my cake. I should have known from the moment I took them out of the packet they would be no good, each case had rubbed the purple colouring onto the one underneath, and I had to forcefully pry each case apart. Needless to say, I will never buy these cases again. I can't fault anything else I've bought from Almond Art, and think it was a problem with the manufacture.

Anyway, apologies, rant over so onwards and upwards!

The lemon cake recipe was as follows (made 12 cupcakes overall):

115g self-raising flour
1/2 tsp baking powder
115g butter
115g caster sugar
2 eggs
Finely grated rind of 1/2 a lemon
2 tbsp milk

  • Preheat oven to 180 degrees
  • Beat butter and sugar with lemon rind
  • Beat in eggs, one at a time, then beat in milk
  • Sift flour with baking powder and fold into mixture
  • Bake for 15-20 mins until golden brown
Nice and simple!

I piped swirls of lemon flavour buttercream, coloured with 2 teaspoons yellow food colouring, (shoved it all in the bowl and mixed until it looked right as usual!), and sprinkled with hundreds and thousands. I also cut out blue fondant butterflies as toppers.


For the last cake, I cut out a white fondant circle, and wrote an 18 on the top using a food colouring pen, iced with Sainsbury's glitter writing icing, and finished off with pink glitter sprinkles. This cake was to sit at the top of a cupcake tree.


Here's the lemon, all boxed up and ready to go.


And three of the orange cakes with roses, and the special 18 cupcake.


Both mum and daughter seemed really happy with them. The party is tonight so I will await feedback on Tuesday, and hope they were as chuffed as they looked when I handed the cakes over!

Monday 23 May 2011

Some juicy cupcakes

Last week I decided to go for an old favourite recipe of chocolate orange cupcakes from a generic cupcake recipe book. The book says this mixture makes 16 cupcakes...they must be really stingy because I just about scrape 10! I wish I had doubled up but I didn't, and 10 cupcakes were never going to make my chums at work happy on a Friday afternoon, so I also made plain orange cupcakes.

I had never made orange cupcakes before, and I just took a recipe for orange cake but split it into cupcakes. OH.MY. I am a complete chocolate obsessive but I loved these plain orange cupcakes. They rose to perfection (for a change!) and were soft, light and fluffy.


Recipe for chocolate orange cake:

115g butter
115g golden caster sugar
inely grated rind and juice from 1/2 orange
2 eggs
115 self-raising flour
25g plain chocolate, grated

  • Preheat oven to 180⁰.
  • Put butter, sugar and orange rind in a bowl and beat together until light and fluffy.
  • Gradually beat in eggs.
  • Sift in the flour and, using a metal spoon, fold gently into the mixture with orange juice and grated chocolate.
  • Bake cupcakes for around 20 minutes, until risen and golden brown.
Very sweet and simple!

The recipe for the orange cake came from Australian Women's Weekly Cupcakes & Baking book. I basically used the mixing method above, but with the following ingredients (technically a cake recipe, but made about 16 deliciously huge cakes!):

150g butter
1 tbsp finely grated orange rind
(I added a splash of fresh orange juice too)
150g caster sugar
3 eggs
225g self-raising flour
60ml milk

I couldn't tell you the recipe for my frosting, because usual I chucked everything in haphazardly until it looked right. Anyway, to decorate the chocolate orange, I piped a simple chocolate buttercream and put a Malteaser in the middle. For the orange cupcakes, I used the rest of the fresh squeezed orange juice to make an orange buttercream, and decorated with fondant roses, using this fantastically easy tutorial from Almond Art. I then piped leaves using a Wilton #67 tip...as you can see from the pictures, I have yet to perfect the technique of piping leaves, and cake photography! Still, I was pretty chuffed with these cakes, and they were delicious.

Monday 16 May 2011

Red Velvet Cupcakes

I've heard a lot about red velvet cupcakes, and lots of people seem to rave about them, so I thought it was about time I gave them a go...they made a right mess! My finger was just one casualty of the red food colouring.
I used the recipe from my Hummingbird Bakery book, except I had no white vinegar so I used cider vinegar instead which is just a little sweeter, and some recipes call for it rather than white vinegar.

This recipe called for a LOT of beating. Now call me old-fashioned, but I've always been taught (mainly by my mum who is also a baking enthusiast) and by all of her 70s cookbooks, to fold flour gently into the mixture right at the end, to trap the air and ensure your cakes rise to perfection. So I was a bit dubious about all this high speed whizzing Hummingbird Bakery suggested - but I guess they are experts! Unfortunately my cupcakes rose rather unspectacularly. I seem to have somewhat of an issue with cakes that hardly rise though, and I think the problem is more to do with my cranky old oven than the recipes/techniques I'm using. Any tips would be very welcome though, as replacing the old oven isn't an option at the moment!

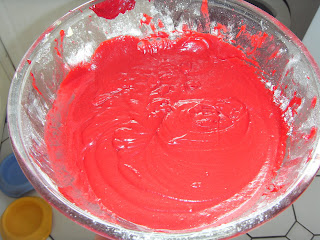
Anyway, this picture doesn't do the mixture justice - it was a brilliant blood red!


The recipe said bake for 20 - 25 minutes, but I took mine out after 20 and thought that was just a little too long; 18 or 19 minutes would have been just right.

I piped these with a simple vanilla buttercream, but I've heard cream cheese frosting is the traditional topping for red velvet cupcakes. I tend not to use a recipe for buttercream and have a habit of throwing everything in until it looks right. But here is the recipe for the cupcakes (not exactly as it appears in the Hummingbird Bakery book as they are very descriptive and I'm a lazy typer!) my notes in italics:

60g unsalted butter
150g caster sugar
1 egg
1 tbsp cocoa powder
2 tbsp red food colouring
1/2 tsp vanilla extract
120ml buttermilk
150g plain flour plus 2 tablespoons
(I don't know why the extra 2 tablespoons...)
1/2 tsp bicarbonate of soda
1 1/2 tsp white vinegar (or cider vinegar in my case!)

  • Preheat oven to 170⁰C.
  • Beat butter and sugar on a medium speed until light and fluffy. Turn the mixer up to a high speed, and slowly add egg and beat until everything is well incorporated.
  • In a separate bowl, mix the cocoa, red food colouring and vanilla extract to make a dark thick paste (I found it wasn't quite 'paste' like...slightly runny) add this to the butter mixture and mix thoroughly until everything is evenly combined and coloured.
  • Turn mixer to a slow speed and pour in half the buttermilk. Beat until well mixed, then add half the flour and beat until everything is well incorporated. Repeat until all buttermilk and flour has been added.
  • Turn mixer to a high speed, and beat until you have a smooth, even mixture. Turn the mixer to a slow speed and add the bicarbonate of soda and vinegar. Turn up the speed and beat again for a couple more minutes.
  • Spoon into cases and bake for 20-25 minutes (I think 18 or 19 would be enough)

And voilĂ ! My finished cake, topped with a red fondant heart. They looked quite pretty and wow, they tasted good! I will be making red velvet cupcakes again, very soon hopefully, but perhaps with a slightly different recipe next time...

Monday 9 May 2011

Chocolate Mud Cake

So Sunday in fact ended up being beautifully sunny after the rainfall in the night, so my beau and I headed out for the day to catch the rays. I made sure to stop by the shop for ingredients though, as I've been meaning to try this recipe from Sarah-Jane's blog since she posted it in March. Unfortunately for me, she posted it during lent, and every year (don't ask me why or how it started!), I give up chocolate. It's not for religious reasons, it's just to prove to myself that I don't need to eat chocolate - yes it does always end with me stuffing my face on Easter Sunday, so yes it probably is pointless, but it's sort of a tradition. Anyway giving up chocolate means all things chocolate; cake, biscuits, milkshake, hot chocolate etc etc. Basically anything that has chocolate/cocoa powder in it, therefore everything I love!

Anyway, I gave this chocolate mud cake a try, and as Sarah-Jane says, this does make a mammoth amount of mixture and needed my biggest mixing bowl. I took her advice and ladled this into a jug before attempting to pour it into moulds. I made four extra wide cupcakes, using Zeal silicone moulds, six heart shaped cupcakes, and a CAKE cake mould, which Sarah-Jane sells in her online shop. And that wasn't even all of the mixture used up!


I greased and floured my moulds, but I think I will just grease in future, as I found the flour stuck to the side of the cakes and didn't look very nice. I didn't have any trouble getting the cooked cake out of the heart shaped moulds or the large cupcake moulds, but sadly for me being as impatient as I am and trying to pop it out straight away, my CAKE cake didn't make it. This cake is fragile, especially when hot, and unfortuantely the C and the K broke. I would have recreated the broken letters to make a complete CAKE, but my sticky-fingered friends snatched the intact A and E, and ate them, so I gave up on that idea.

With the extra wide cupcakes, I tried out a decorating idea from a book by Lily Vanilli entitled 'A Zombie Ate My Cupcake' for the first time. This book features many deliciously gory recipes, and I would like to review the book in a later post, but I am aware this one is dragging on. Anyway, thus, my Zombie Hands were born! These cakes are a little gruesome, so not for the faint hearted!


They didn't come out perfect, and I apologise for my bad photography skills here, but you get the idea - zombie hands breaking free from the soil in a graveyard.

For the hearts I went a bit more cutesy, filling my cake moulds with about 1cm of chocolate to make solid chocolate toppers, as Sarah-Jane did in her post. Mine did not look nearly as perfect as hers did, and I should have placed the mould onto a baking sheet prior to putting it in the fridge, as it bent slightly picking it up, causing the molton chocolate to run up the sides and leaving me with wonky toppers. But we live and learn, and I am just learning as I go along!

This cake was as I expected - deliciously sweet, gooey, and completely sinful, and I loved it. They weren't my most picture perfect cakes, but nobody seemed to mind!


Sunday 8 May 2011

My first post!

So as today is the first rainy day we've had after what was apparently the hottest April since records began, I decided it was time to sit down and start something I've been promising myself I would do for a long time; start my own blog. So here is it! Welcome to Beauty and the Cake.


I'm passionate about all things cake, so I'm hoping to share some great recipes, techniques and learn from some other brilliant bloggers as I go along. I've been trying to teach myself the basics of cake making and decorating for a while now, and  wanted to share my journey.